Body Shape Guide
Pear Body Shape
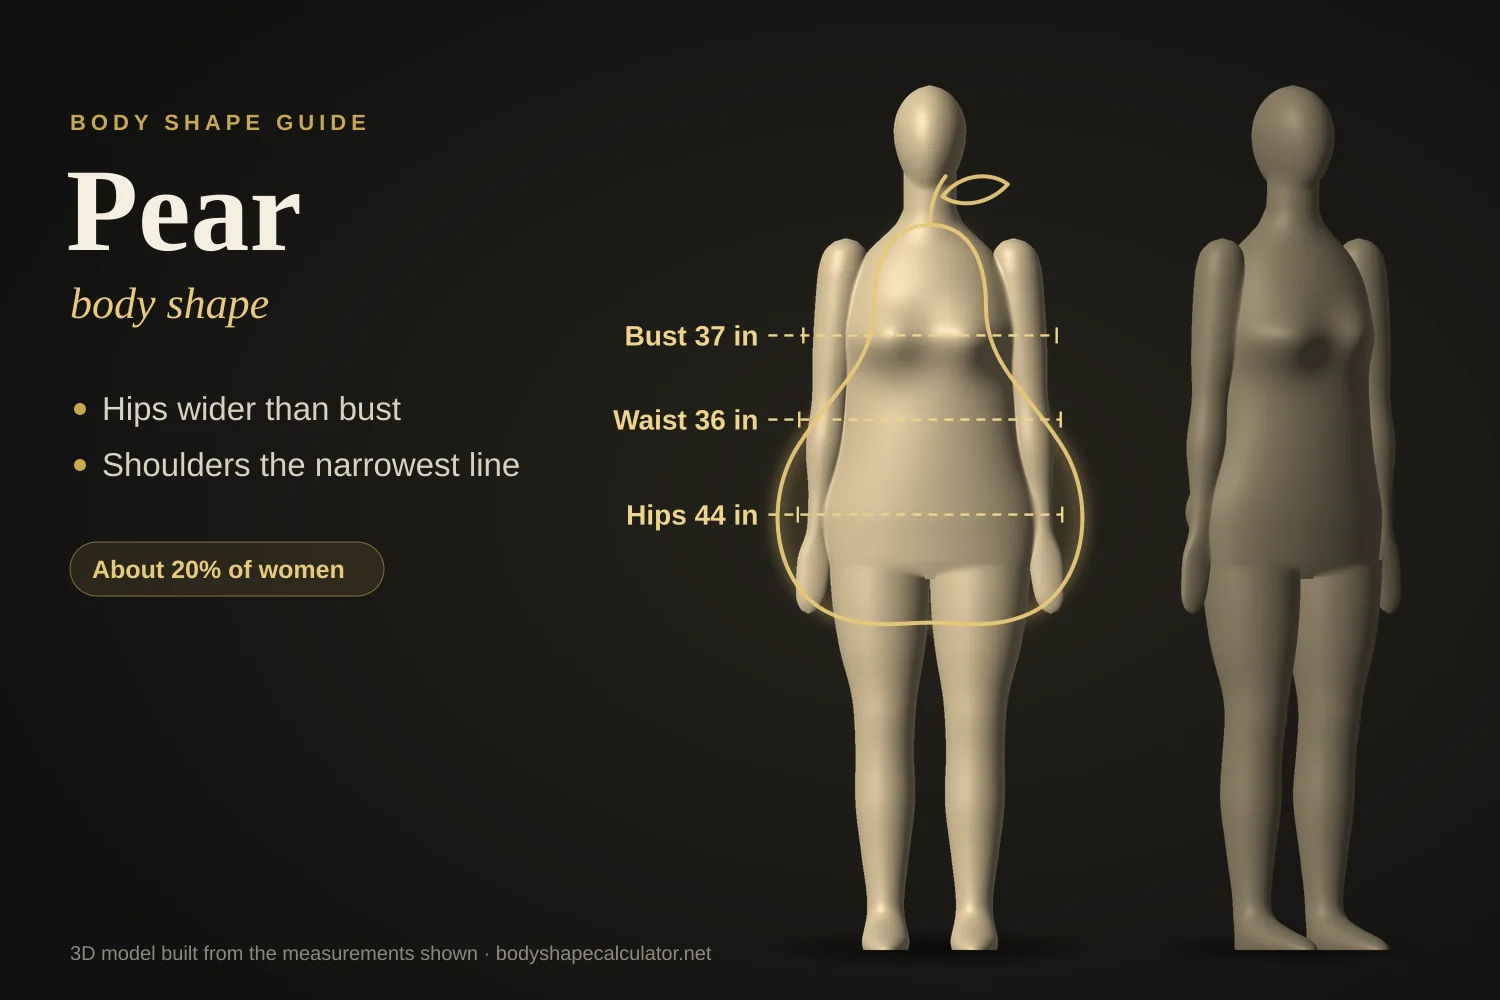
Hips visibly wider than the bust, with a waist that's present but not sharply carved — the second most common of the seven female body shapes, at roughly 20% of women. Here's the exact formula, how it differs from its closest cousin, and how to dress for it.
What Is a Pear Body Shape?
A pear body shape — also called triangle — has hips that are noticeably wider than the bust, without the sharp waist definition you'd see in an hourglass. It's the classic "narrower on top, fuller below" silhouette, and it's driven by where the frame naturally carries fullness: hips, thighs and seat rather than the bust or shoulders. If you haven't run your own numbers yet, our full body type calculator will tell you exactly which of the seven shapes you land in.
The formula: hips have to be at least 3.6 inches wider than the bust, and the gap between hips and waist has to stay under 9 inches. That second condition is the part people miss — a pear isn't waistless, it just doesn't have the dramatic 9-plus-inch taper that defines an hourglass or a bottom hourglass. The waist is soft, not sharp.
Quick check: hips at least 3.6 inches wider than the bust, waist within 9 inches of the hip measurement. If your waist is more than 9 inches smaller than your hips, you're actually a bottom hourglass, not a pear — the styling advice shifts a little.
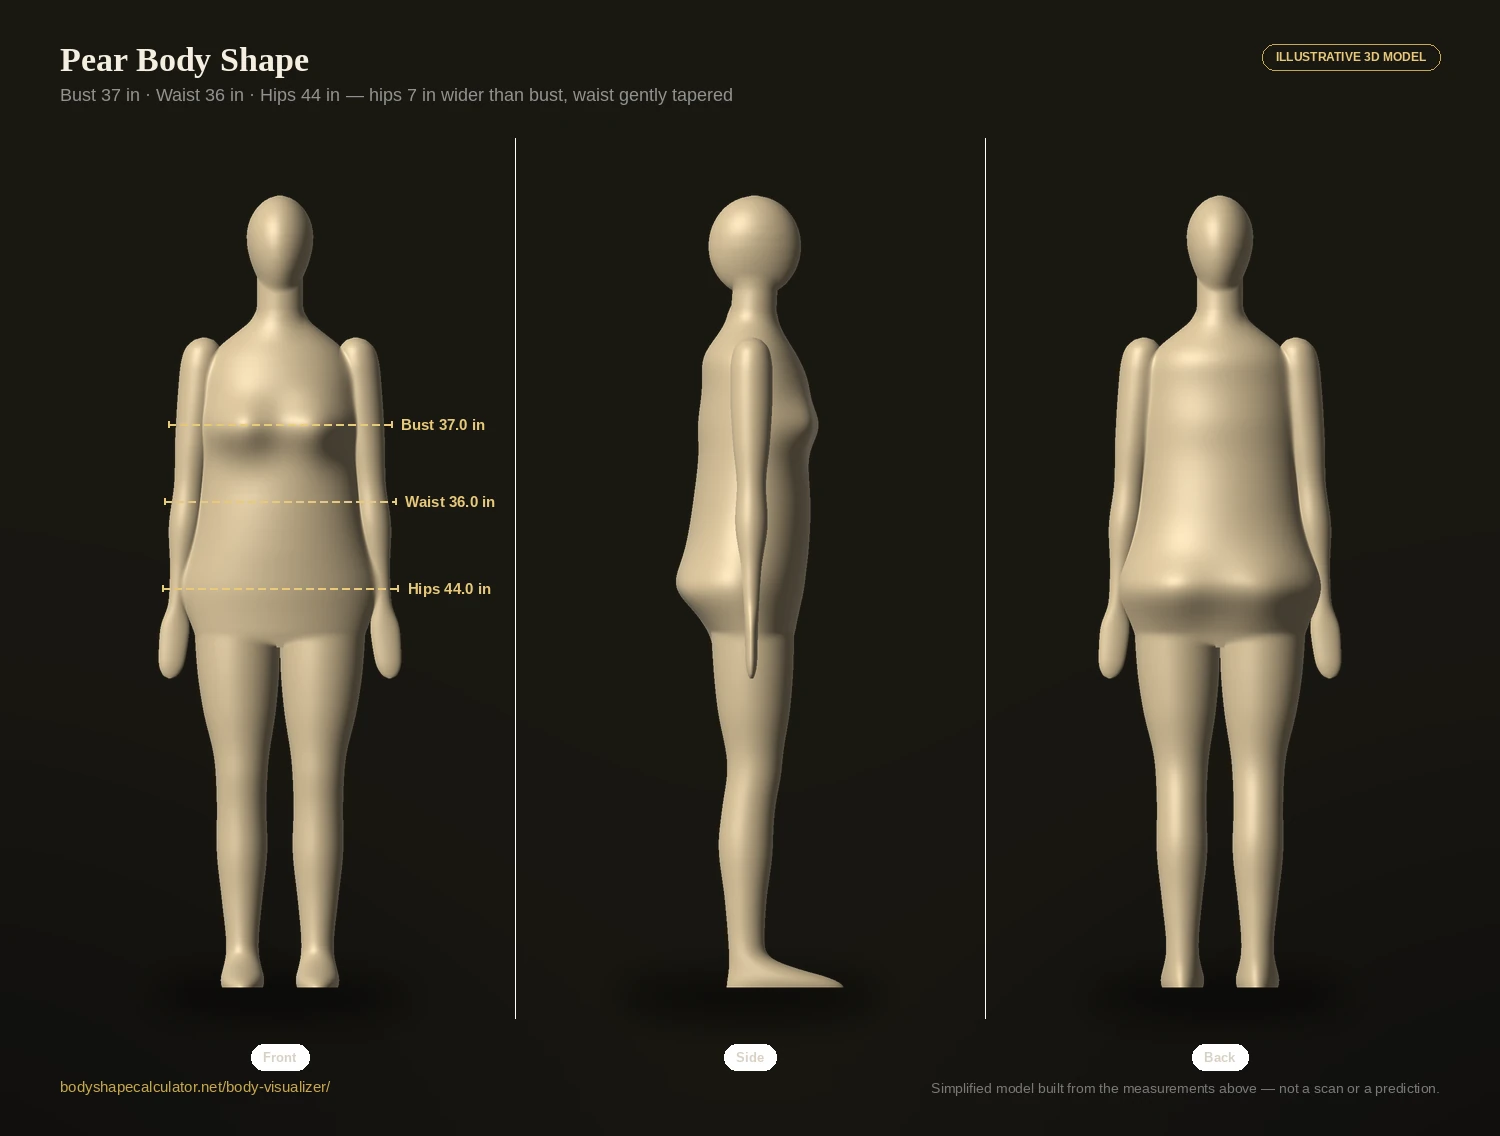
To see how a pear shape looks interactively, tap the Pear preset in our body visualizer (female model, Try a shape) and switch between the front, side and back views. Or use Compare A/B to set it next to a bottom hourglass.
How Common Is the Pear Shape?
The most widely cited figures come from a 2006 NC State analysis of over 6,000 women, which puts the pear shape at roughly 20% of the population — the second most common shape after rectangle (~46%). Apple comes in around 14%, and the hourglass family, despite its cultural prominence, is the rarest at around 8%. These specific numbers trace to a press release rather than a peer-reviewed table, and later re-analyses using different methods have found different splits, so treat them as a general picture rather than an exact count.
That makes pear one of the two shapes — alongside rectangle — that a majority of women are likely to recognise themselves in, which is exactly why so much mainstream styling content is really written for this shape even when it doesn't say so.
Pear vs Bottom Hourglass — What's the Real Difference?
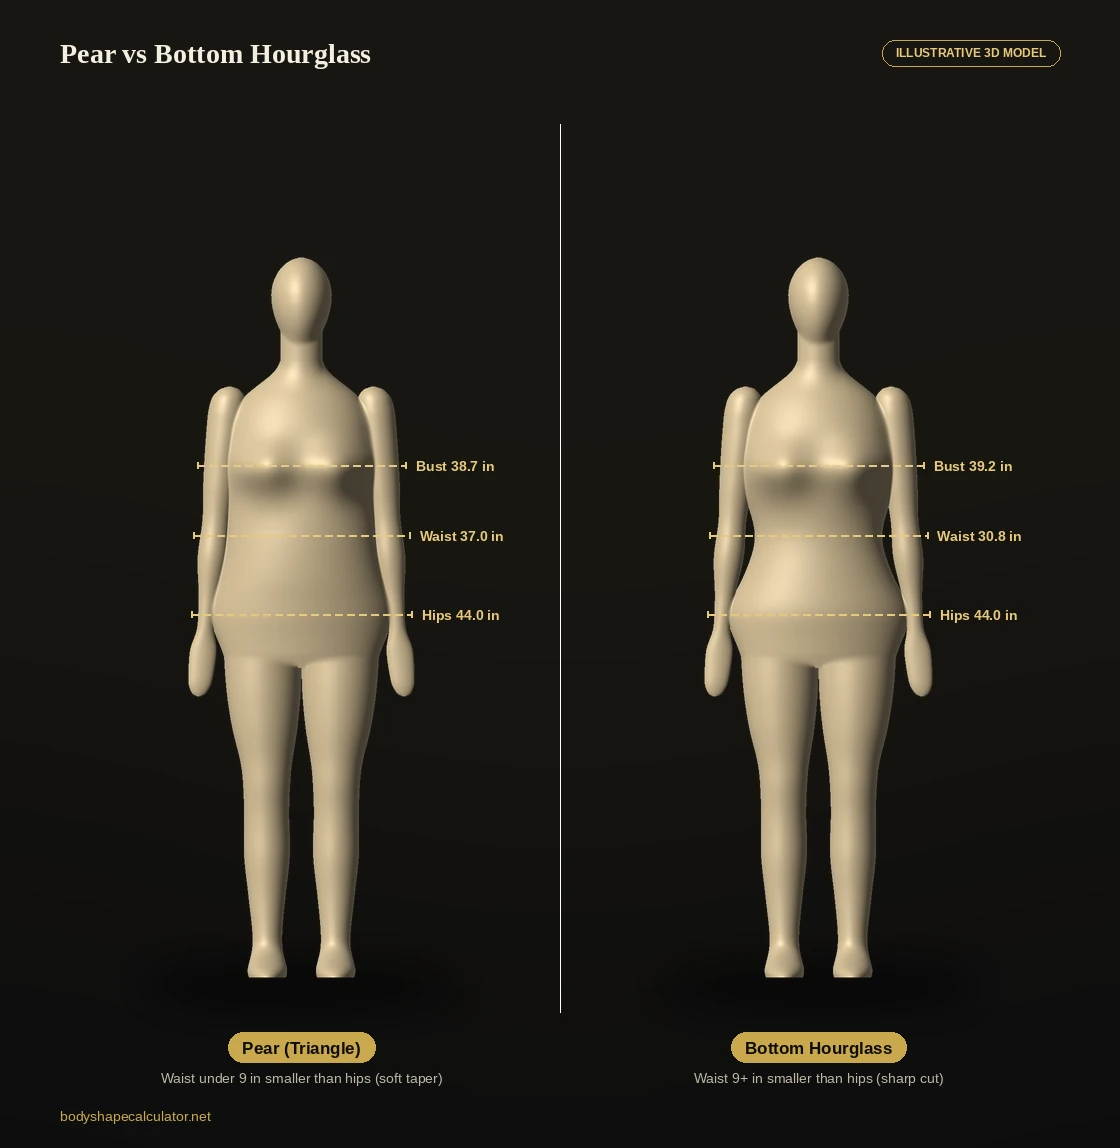
These two are the pair most people mix up, because both have hips wider than the bust. The split comes down entirely to the waist.
| Trait | Pear (Triangle) | Bottom Hourglass |
|---|---|---|
| Hips vs. bust | 3.6 in or more wider | 3.6–10 in wider |
| Waist definition | Under 9 in smaller than hips (soft) | 9 in or more smaller than hips (sharp) |
| Visual read | Gradual taper from hip to waist | A clear inward cut at the waist |
| Styling focus | Add width up top to balance | Show off the waist, balance is secondary |
You'll also see "spoon" used online as a related term — some calculators split out a spoon shape using a high-hip "shelf" measurement just below the waist. It's a genuine, well-documented distinction, but it's a subtler one than pear vs. bottom hourglass, and most people searching for spoon-shape advice find that the pear styling tips below work just as well for them. Our full body type calculator flags this shelf pattern automatically when it shows up in your result.
Waist-to-Hip Ratio for a Pear Shape
Because fullness sits in the hips rather than the waist, pear shapes tend to land on the favourable side of waist-to-hip ratio (WHR) — typically somewhere around 0.70 to 0.80, under the WHO's 0.85 threshold for elevated risk in women. Fat carried in the hips and thighs (subcutaneous fat) behaves differently, metabolically, than fat carried around the waist and abdomen (visceral fat), which is part of why pear shapes are generally associated with lower cardiovascular risk than apple shapes at a similar body size.
Run your exact numbers on our waist to hip ratio calculator rather than relying on the shape category alone — WHR uses your specific waist and hip figures, and it's worth checking on its own. For a fuller set — including bust-to-hip ratio and your body shape — try the body proportions calculator.
The Pear Shape Rule in Two Lists
Almost every recommendation further down comes from one idea: build up the top half, keep the bottom half smooth. If you remember nothing else, remember these two lists.
Add above the waist
- Wide necklines — boat, square, off-shoulder
- Puff, cap or dropped-shoulder sleeves
- Light colours, prints and detail on top
- Structured shoulders on jackets
- Cropped knits that stop at the waist
Keep smooth below the waist
- A-line skirts and fit-and-flare dresses
- Wide-leg trousers and bootcut jeans
- Darker, plain fabric on the bottom half
- Hems that clear the widest point of the hip
- No heavy pockets or detail at hip level
How to Dress for a Pear Body Shape
The core rule for this shape is balance: adding structure and width through the shoulder and upper body, while choosing fabric that skims rather than clings through the hip and thigh. The sections below work through each category piece by piece — with a 3D pear figure (37–36–44 in) wearing both versions, so you can judge the balance with your own eyes instead of taking the rule on trust.
Necklines
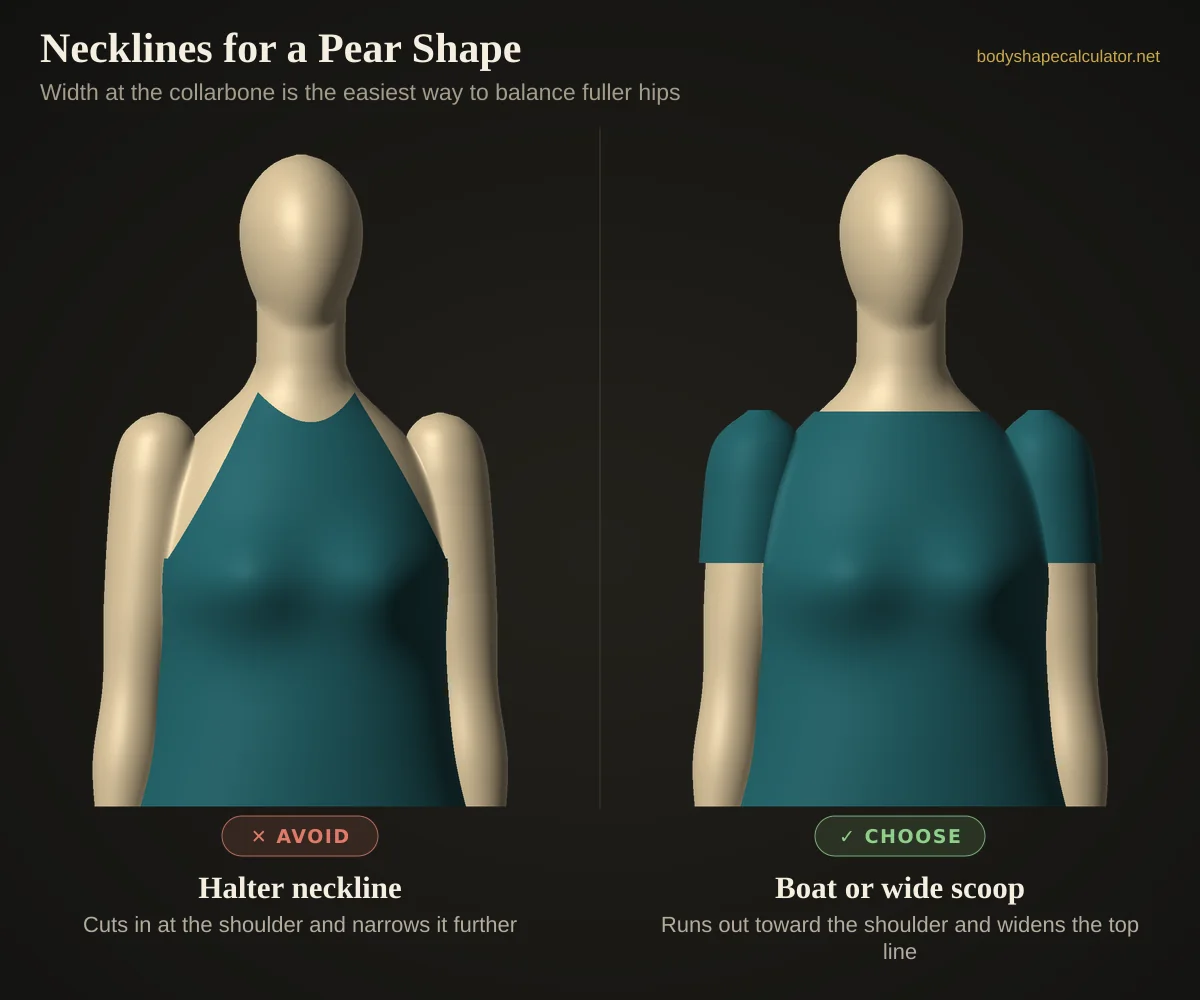
A wider neckline is doing real, measurable work on this shape: it adds visual width exactly at the shoulder, which is the point you’re trying to bring into balance with your hips. A boat or bateau neckline is the clearest way to do that — it runs in a near-straight line from shoulder to shoulder. A wide scoop does a softer version of the same job. Halter necks and other narrow, vertical necklines are the ones to limit, since they pull the eye inward and make the shoulder line look even narrower against the hips below it.
Sleeves
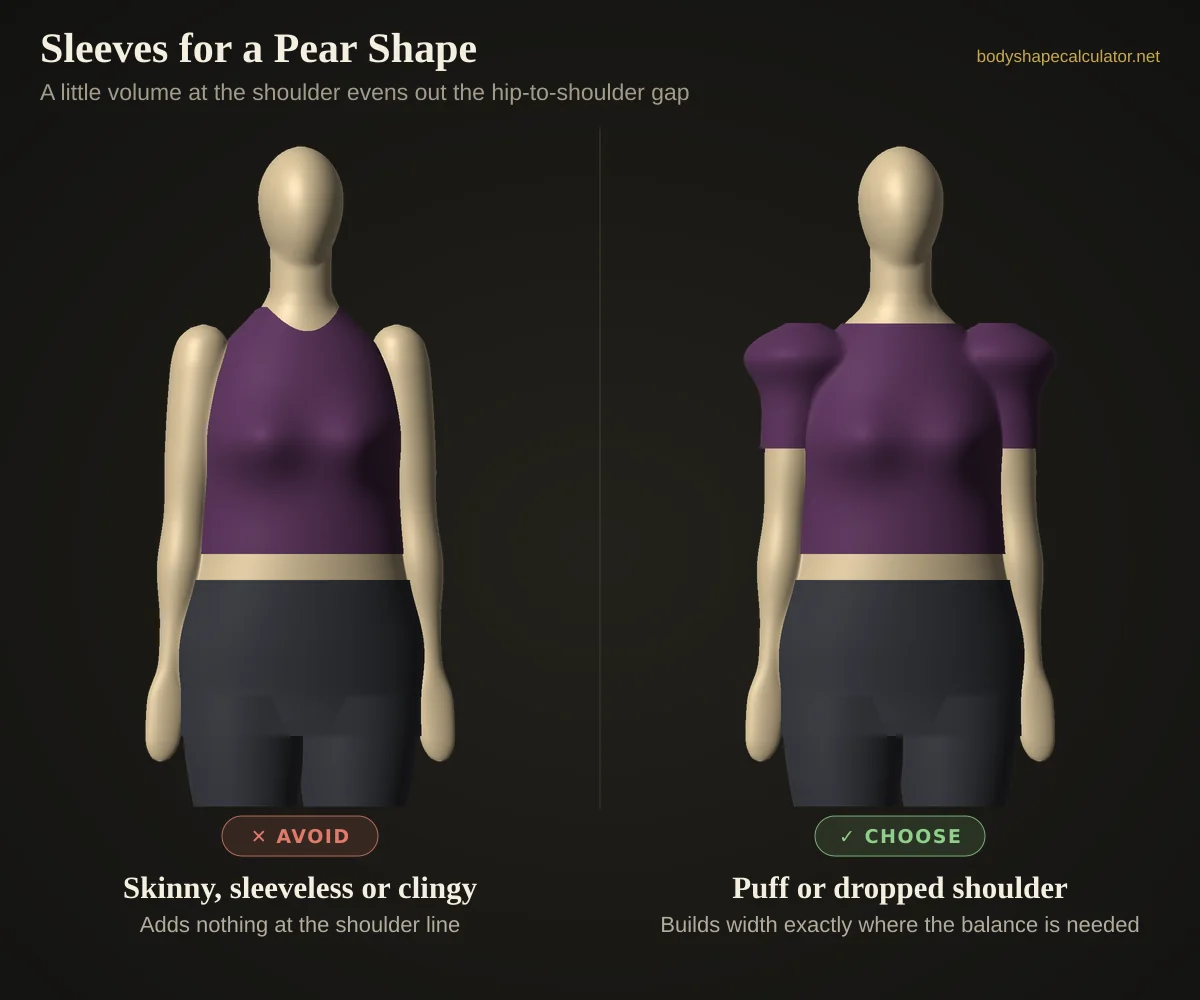
This is one of the few shapes where adding volume at the shoulder is genuinely the goal, not something to avoid. A puff sleeve, a structured cap sleeve, or a dropped shoulder all add a bit of width right at the top of the arm, which reads as broader shoulders even without any padding involved. Ruffle or flutter detail at the shoulder seam does the same job in a softer way. Skinny, tightly fitted sleeves with no shape at the top are the ones that miss the opportunity — they keep the shoulder line as narrow as it already is, doing nothing to balance the hip below it.
Shirts, T-Shirts & Tops
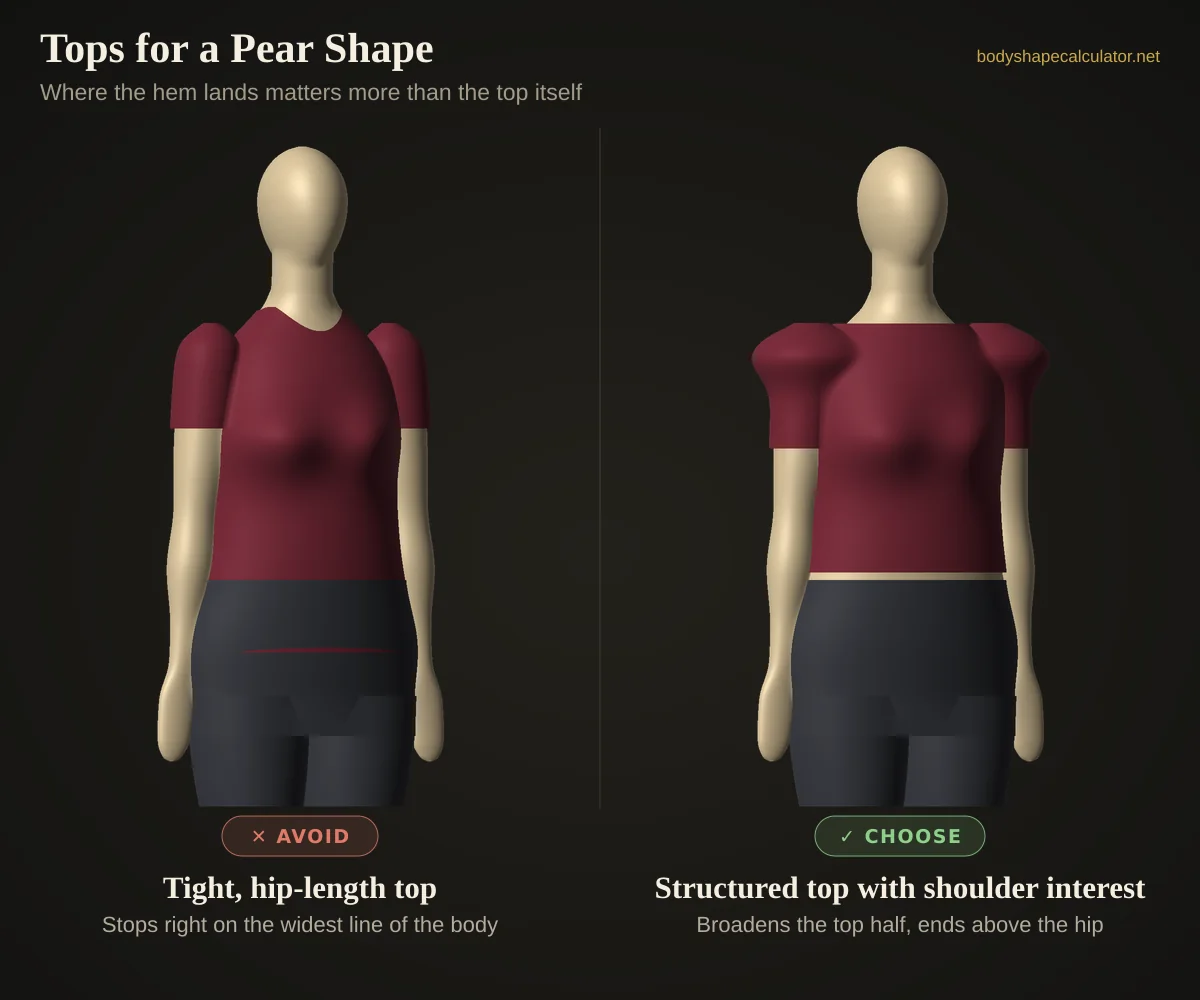
Tops that add structure at the shoulder and stop before they reach the hip are doing double duty for this shape — building width up top while staying clear of the area you’re usually trying to skim past. A peplum top, with its flared hem sitting right at the waist, adds shape at exactly the right point without any fabric continuing down over the hip. A boxy, structured top with some shoulder detail works the same way. What to avoid is a tight, hip-length top: fitted fabric that runs all the way down to the widest part of the hip has nowhere to go but cling to it.
Knitwear
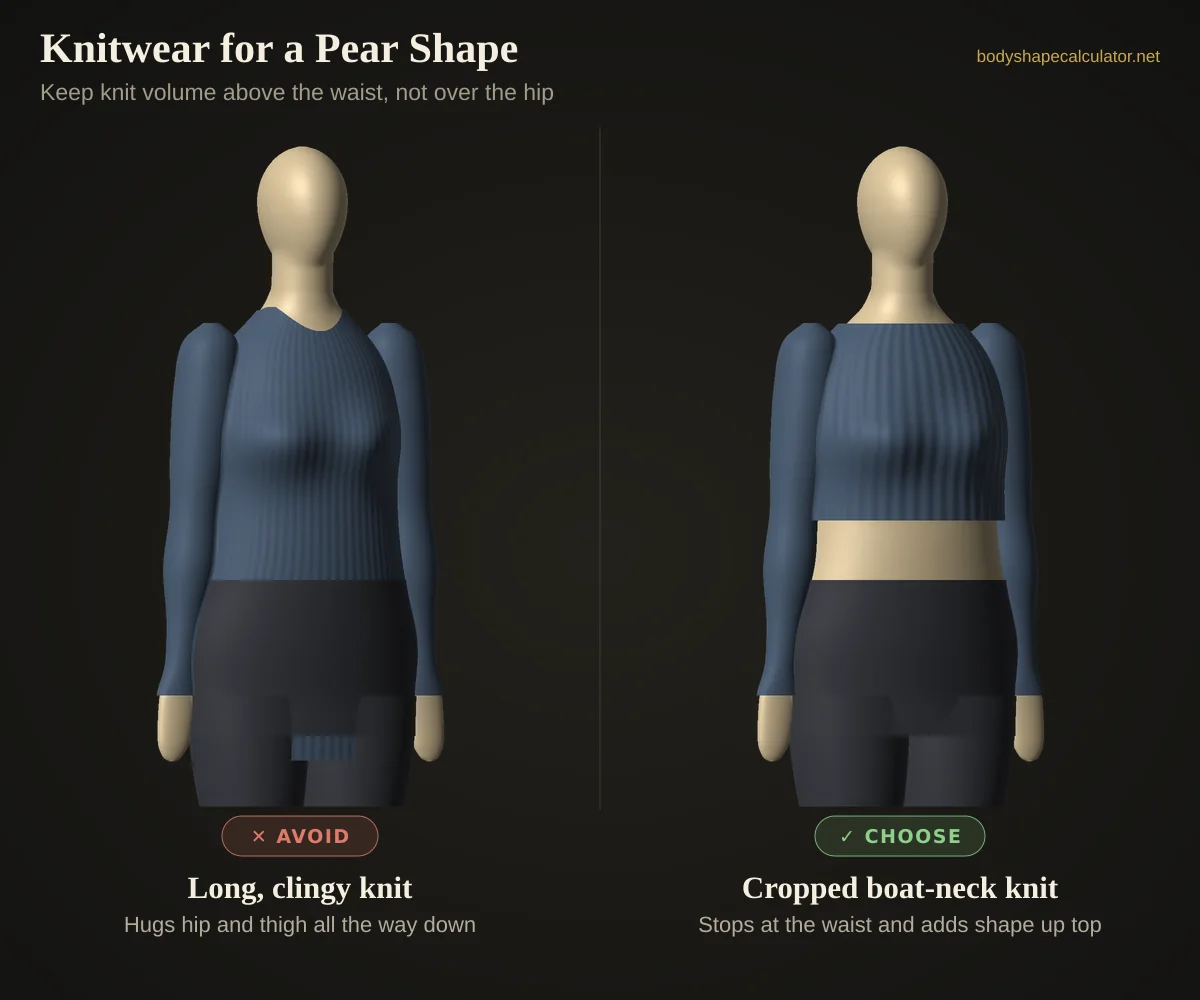
Length matters more than almost anything else in this category. A cropped sweater that ends at or above the hip bone keeps the knit’s natural clinginess away from the part of the body where it would add the most visual width. A structured, slightly boxy knit with some shoulder shaping does the same job while adding a bit of upper-body interest. Long, fitted knits that run past the hip are the trickier choice — knit fabric naturally follows the body’s shape, and a long, snug sweater will trace the hip and thigh line the whole way down rather than stopping before it.
Jackets
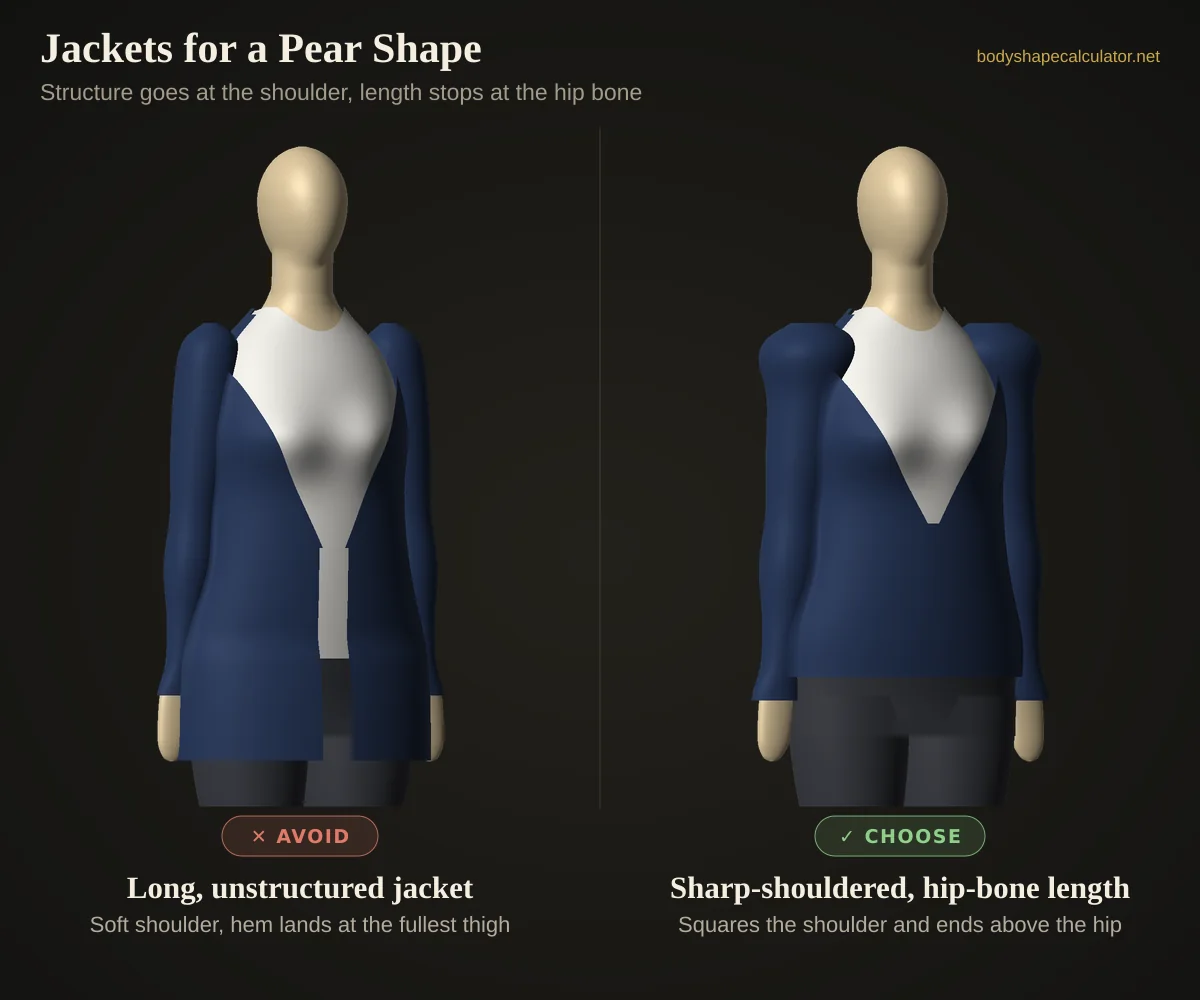
A jacket with some structure at the shoulder — a notch lapel, a slight shoulder seam, a boxy cut — builds width exactly where this shape benefits from it, and a length that ends at the hip bone stops before it reaches the fullest point below. A cropped or hip-length blazer does both of these at once. Denim and utility jackets in a slightly boxy cut work the same way for something more casual. Long, unstructured coats are worth choosing carefully: a soft, floor-skimming coat with no shoulder structure draws one long line down the entire body, including the hip and thigh, rather than stopping to add balance up top.
Coats
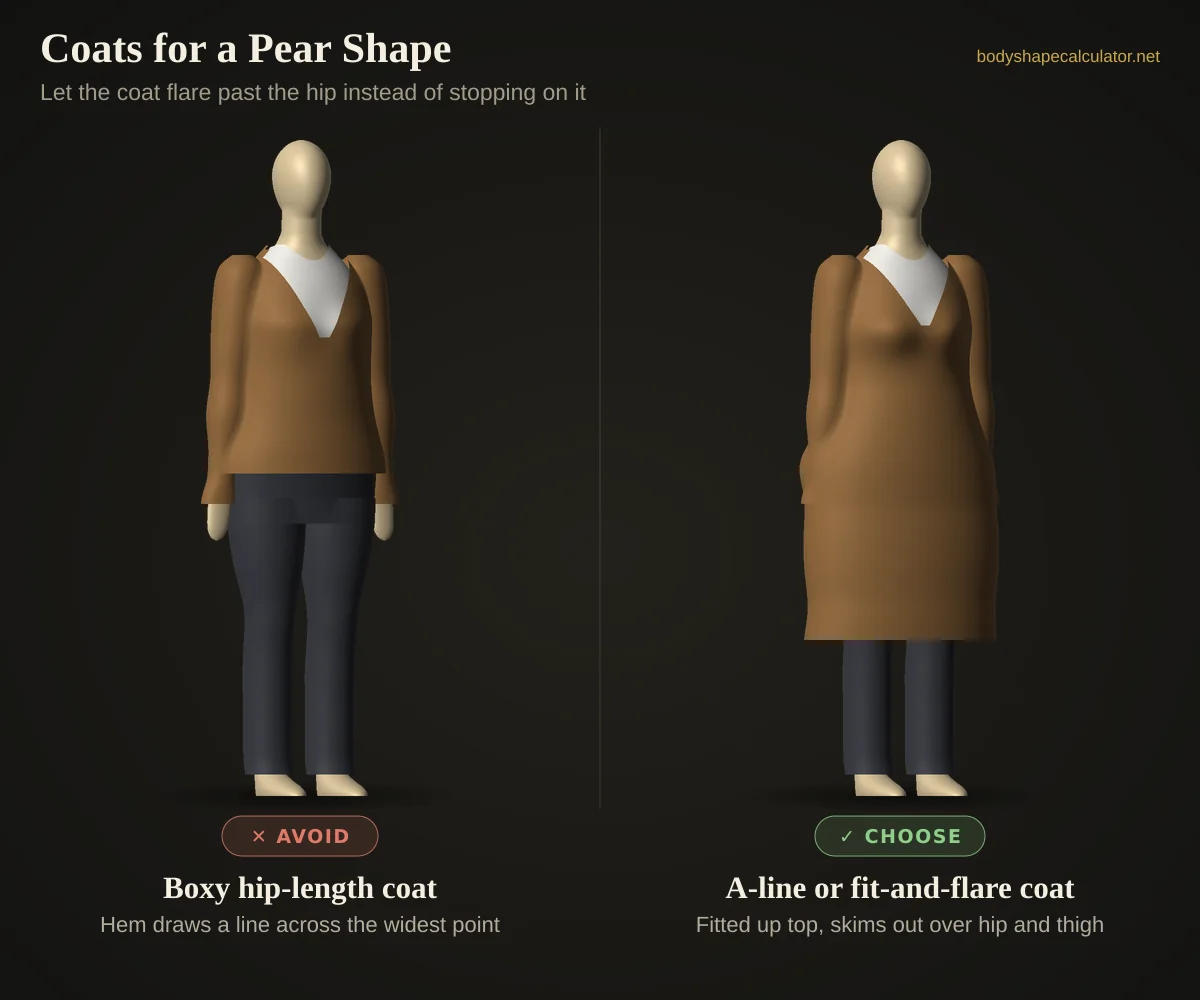
With coats, the question is where the hem lands. A boxy coat that stops right at the hip draws a horizontal line across the widest part of your body — the exact place you want the eye to pass over. Go shorter (a jacket that ends at the waist or hip bone, as above) or go longer: an A-line or fit-and-flare coat that is fitted through the shoulder and bust, then kicks out gently over hip and thigh to knee length. A trench tied at the waist works too, as long as the skirt of the coat has enough flare to skim the hip rather than grip it. Shoulder epaulettes and wide lapels are a bonus here, not a problem.
Trousers
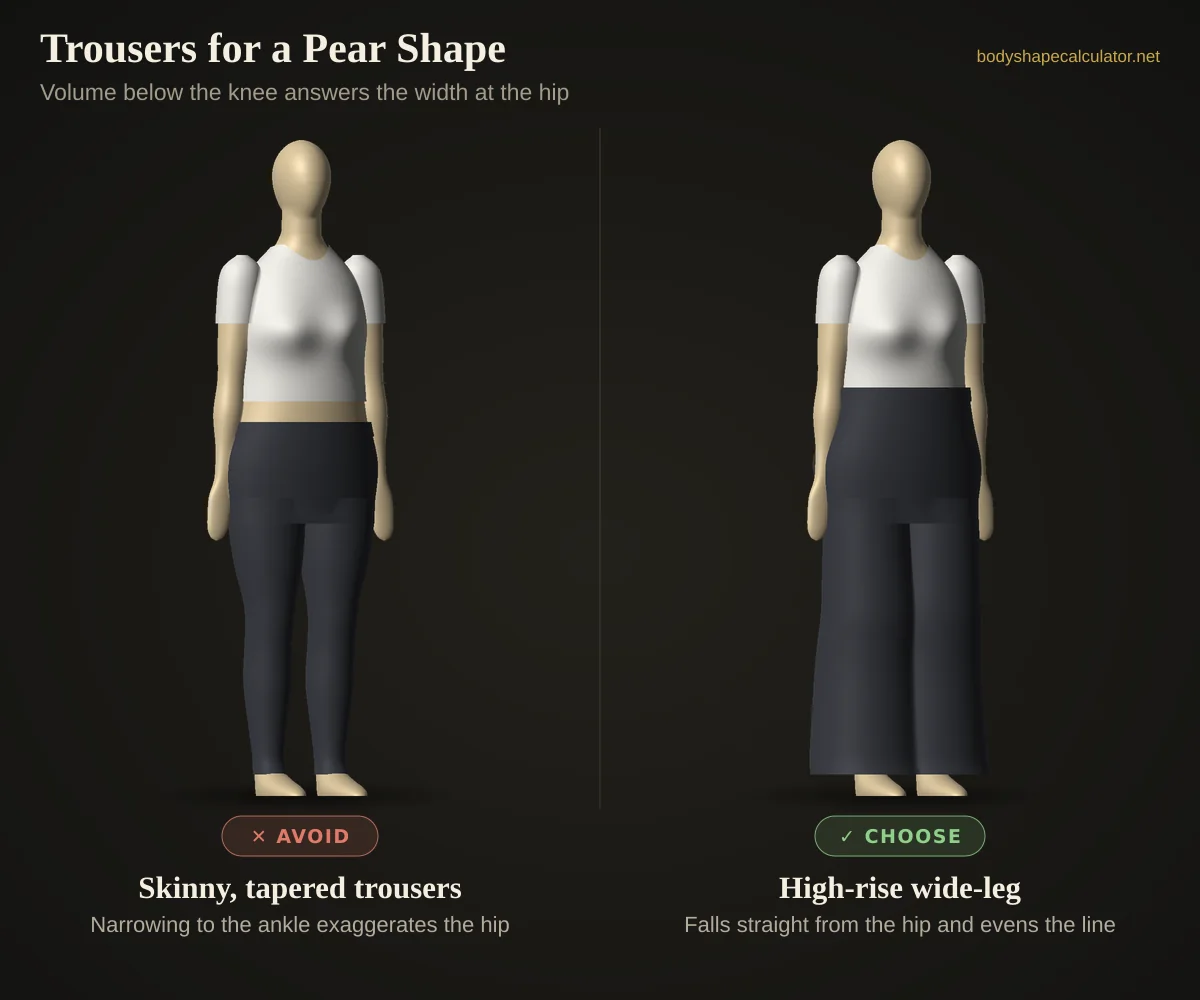
A leg that keeps some width the whole way down reads as far more balanced on this shape than one that tapers in — a wide-leg or bootcut trouser continues roughly the same line from hip to hem, which stops the hip from looking like the widest point of an otherwise narrowing silhouette. A straight-leg cut in a structured fabric is a slightly more fitted version of the same idea. Skinny and tightly tapered jeans are the ones to be selective with, since the fabric narrows sharply below the hip, which makes the hip itself look comparatively wider by contrast rather than balanced against the leg.
Jeans
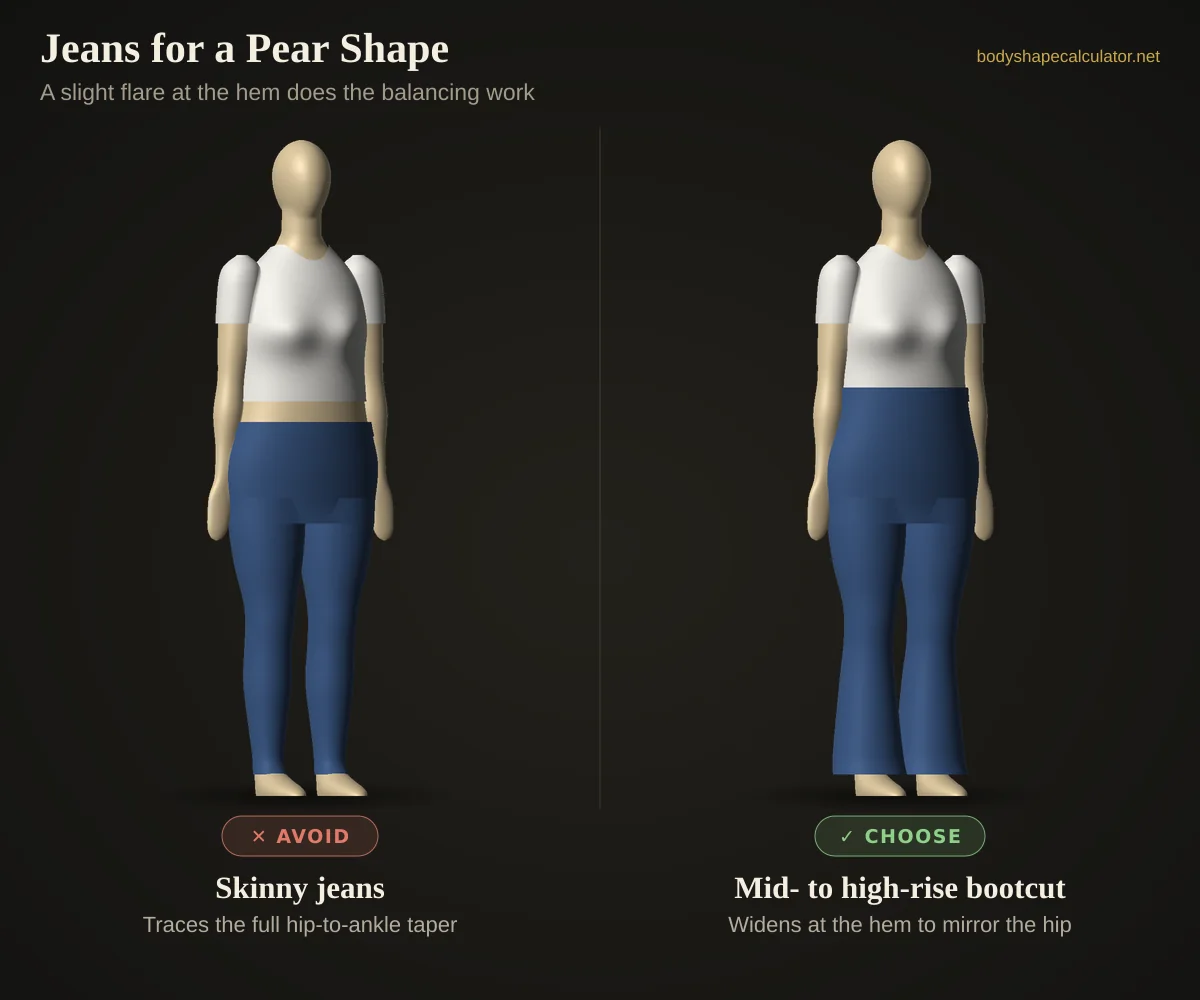
A dark-wash, mid- to high-rise bootcut is the most dependable jean for this shape: the darker colour quiets the lower half, the rise sits above the hip, and the gentle flare at the hem puts width at the ankle to answer the width at the hip. Look at the back pockets too — pockets that are large, set high and slightly angled make the seat look smaller than small, low-set ones. Skinny jeans are the hard case: they trace the whole hip-to-ankle taper and leave the hip as the obvious widest point. If you love a slim leg, pair it with a top that adds width at the shoulder so the two halves still balance.
Skirts
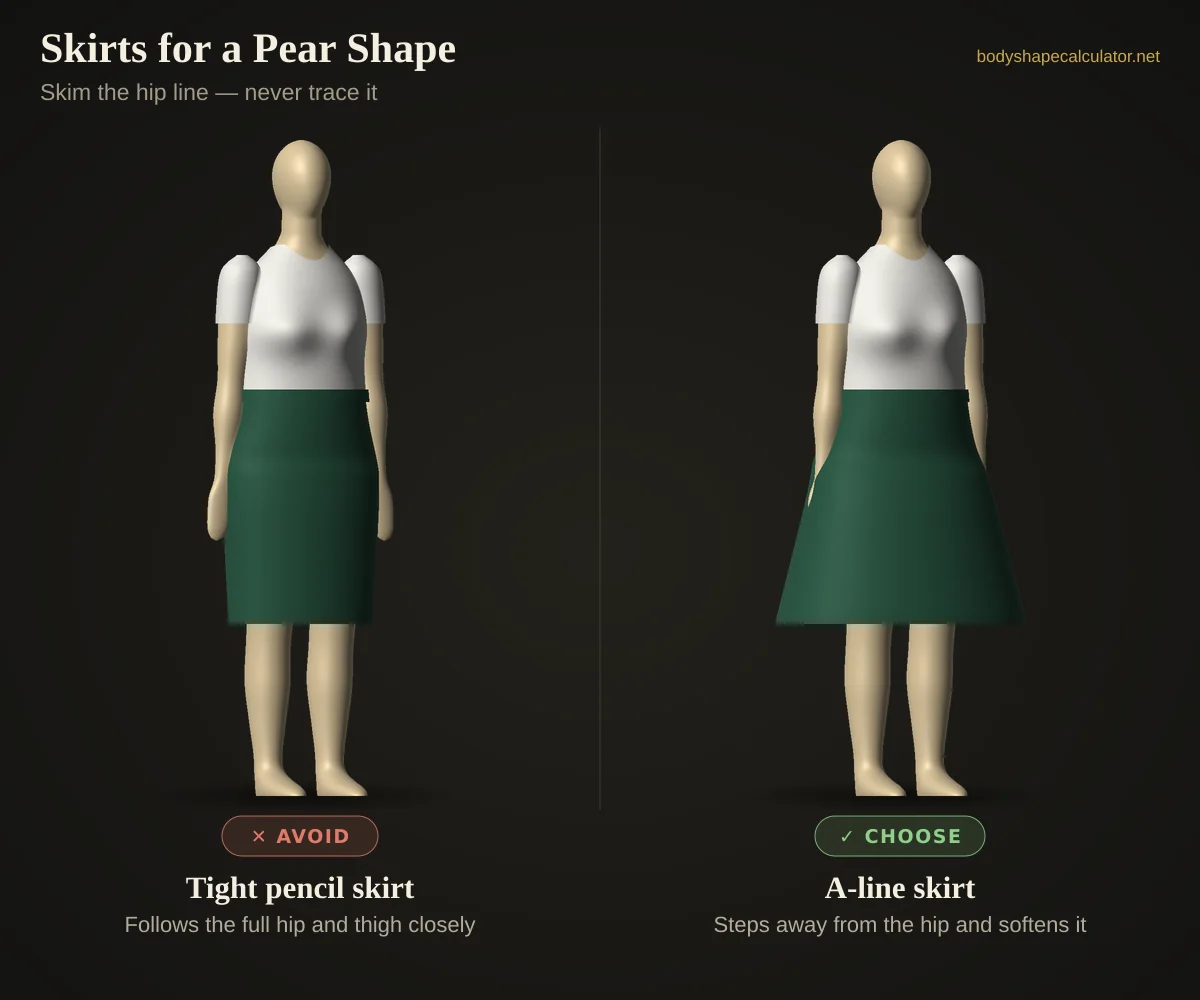
An A-line skirt is one of the most dependable choices available here, because it skims outward from the waist rather than following the hip’s exact width — the fullest part of the body ends up under moving fabric rather than fitted fabric. A gently flared or slightly gathered skirt does the same job with a touch more movement. A tight pencil skirt is the more demanding option: cut close through the hip and thigh, it follows the body’s widest measurement closely for the entire length of the skirt, which is the opposite of the skimming effect an A-line naturally provides.
Dresses
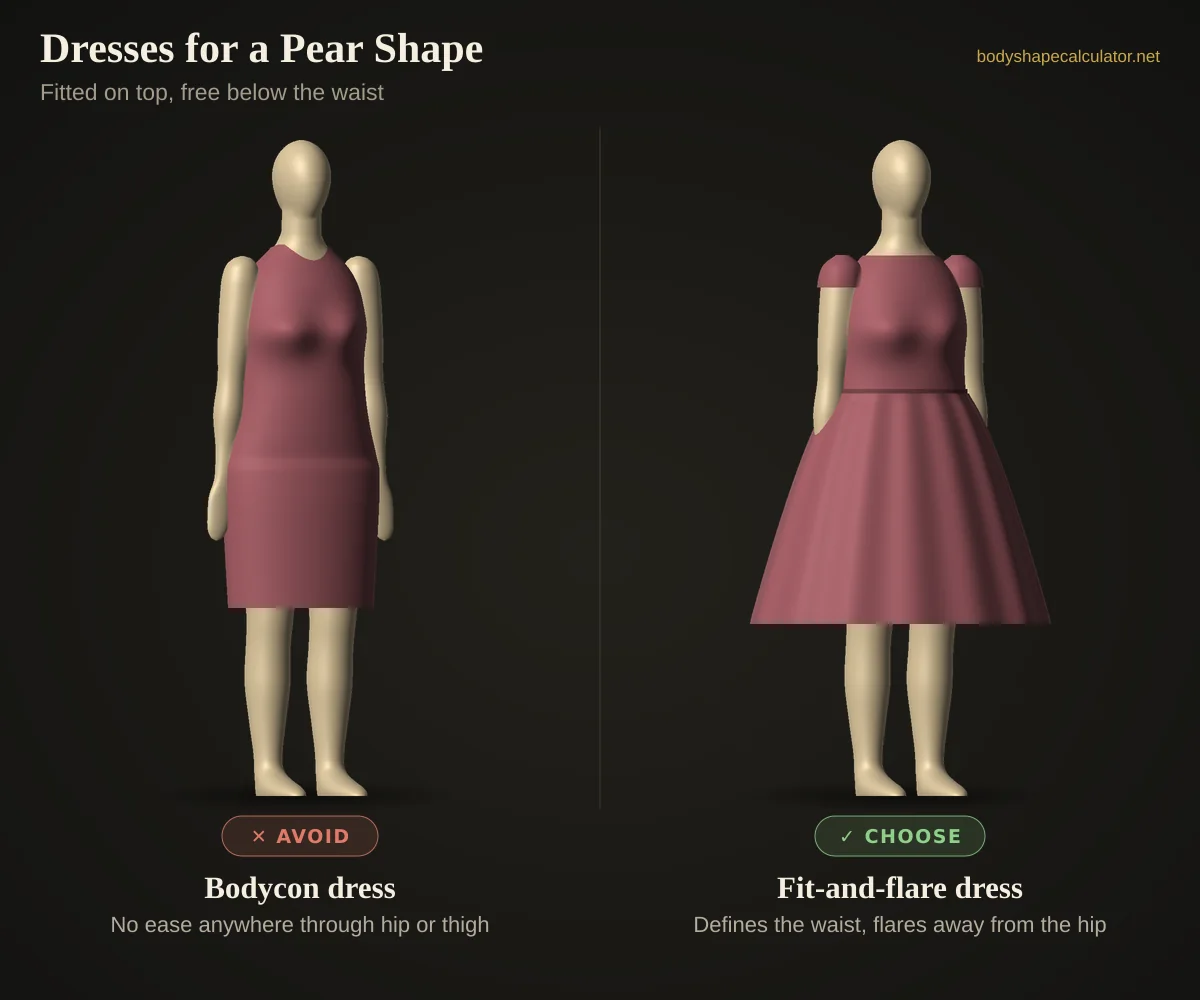
A fit-and-flare dress is close to a perfect match for this shape’s logic: fitted through the bust and waist, where you want definition, then flaring outward right at the point where a fitted cut would otherwise cling to the hip. The flare does the balancing work that a wide-leg trouser or A-line skirt does elsewhere in this guide. A wrap dress with a fuller skirt does something similar with the added benefit of a defined waist tie. Bodycon and other dresses fitted the whole way down are the hardest category here, since there’s no point in the silhouette where the fabric stops following the hip and thigh.
Shorts
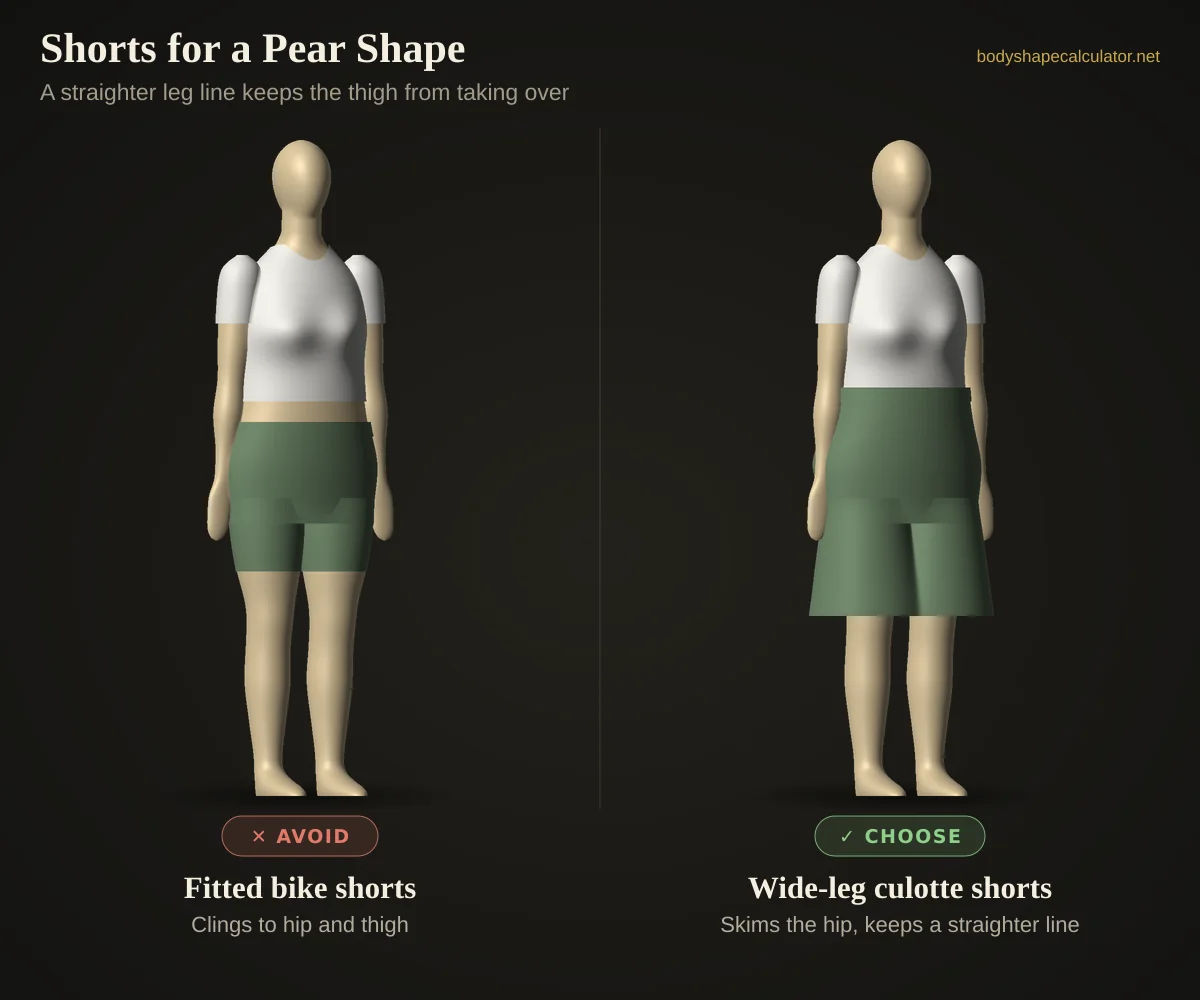
Wide-leg or culotte-style shorts apply the same logic as wide trousers in a shorter length — the fabric skims past the hip and upper thigh instead of following their exact shape, which keeps the leg line looking straighter rather than tapered. A tailored short with a bit of ease through the thigh is a slightly more fitted alternative that still avoids clinging. Fitted bike shorts or anything cut close through the hip are the more difficult choice, since stretch fabric in a snug cut traces the hip and thigh closely for the entire length of the short, with no fabric movement to soften the line.
Jumpsuits & Playsuits
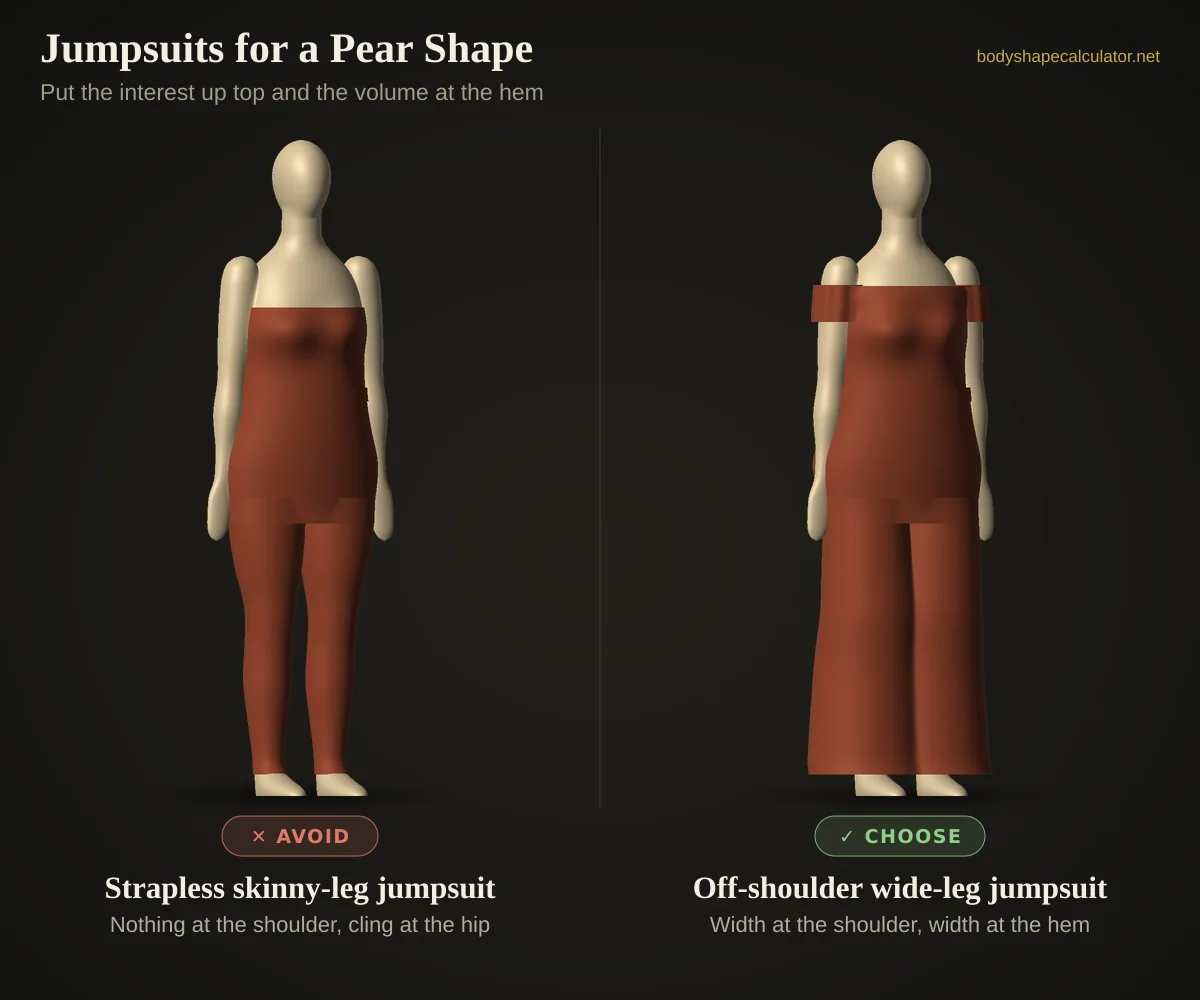
Put the interest up top and the volume at the hem. An off-shoulder or boat-neck jumpsuit with a wide leg widens the shoulder line and lets the trouser fall straight from the hip, so the two halves meet in the middle. A contrasting belt helps if the fabric is plain. Strapless, skinny-leg styles do the opposite — nothing at the shoulder, cling from hip to ankle. For a playsuit, a short flared leg keeps the same logic in summer weight.
Common Pear Shape Measurements by Size
The formula holds across every size range — it's the relationship between the numbers that matters, not their absolute size:
| Frame | Bust | Waist | Hips |
|---|---|---|---|
| Petite | 33 in | 32 in | 39 in |
| Average | 37 in | 36 in | 44 in |
| Plus-size | 44 in | 43 in | 51 in |
Notice the waist sits close to the bust in every row — the defining gap is between hips and everything else, not a dramatic waist taper. That's the detail that separates a pear from a bottom hourglass at the same hip measurement.
Try the average row in the Body Visualizer: switch to inches, enter a 37 in bust, 36 in waist and 44 in hips, and the live analysis confirms the shape while you rotate the model.
Frequently Asked Questions
What is the exact formula for a pear body shape?
Hips at least 3.6 inches wider than the bust, and a hip-to-waist gap of under 9 inches. Both parts matter — the first rules out rectangle and hourglass shapes, and the second is what separates pear from bottom hourglass, which has the same wider-hip pattern but a much more defined waist.
Is pear the same as spoon body shape?
They're related but not identical. Spoon is a more specific pattern where there's a pronounced "shelf" at the high hip, just below the waist, measured separately from the full hip. Pear is the broader category. If a calculator gives you spoon specifically, pear styling advice still applies — the shelf mainly affects fit at the high-hip area of trousers and skirts.
Pear vs bottom hourglass — which one am I?
Check the gap between your hips and your waist. Under 9 inches, you're a pear. Nine inches or more, you're a bottom hourglass. Both have hips wider than the bust — the waist definition is the entire difference.
Is a pear shape healthier than an apple shape?
In terms of fat-distribution risk specifically, research generally does favour pear over apple — hip and thigh fat behaves differently, metabolically, than abdominal fat, and is linked to lower cardiovascular risk at a comparable body size. That's a population-level pattern, not an individual guarantee; overall health depends on far more than shape alone.
Can a pear shape change with weight loss?
Weight loss reduces fat everywhere to some degree, but it tends to make an existing shape more pronounced rather than converting it into a different one — hip and thigh fat is often the last to reduce for pear-shaped bodies specifically. Strength training that builds the shoulders and upper back is a more direct way to shift the visual proportion.
What's the most flattering swimsuit for a pear shape?
Tops with detail, structure or a high neckline paired with a plain, darker bottom in boyshort or high-waisted styles. The goal is the same as with everyday clothing: add visual interest above the waist so the frame reads as balanced rather than bottom-heavy.
Most "pear body shape" advice online skips the waist-to-hip distinction entirely and treats every wider-hipped body the same way — which is how pear and bottom hourglass end up with identical styling tips despite needing slightly different approaches. Once you know which side of that 9-inch line you're on, the advice gets a lot more specific.
This guide is for educational and styling purposes only. It does not diagnose any medical condition and isn't a substitute for advice from a qualified healthcare professional.